Field Types
Field types have been discussed previously, but Access has a few more options associated with the main types - these are detailed below:
Integers:
|
Integers are whole numbers, and integer variables are used when you know there is never going to be anything after the decimal point, e.g. if you're writing a lottery ball generator, all the balls have whole numbers on them. The difference between short integers, integers and long integers is the number of used to store them - if you're going to be dealing with large numbers, then select Long Integer. Remember that number fields allow you to enter numbers only - if you want to include spaces or punctuation, choose text. |
Floating point:
|
Floating point numbers are ones that contain fractional parts - i.e. they are not whole numbers. The single and double quantifiers are analogous to the short and long quantifiers used with integers - i.e. they indicate how many bits are used to store the variable. Floating point arithmetic can lead to problems with rounding and precision, so if you're dealing with a limited number of decimal places, it is probably more efficient to use integers and multiply all your values by a power of 10. |
| Boolean (yes/no) |
A Boolean variable can store one of two values - either TRUE or FALSE. This is actually stored as an integer - in VisualBASIC, for example, FALSE is 0 and TRUE is -1, and you can use these values in calculations. |
Strings:
|
Strings are variables that contain text, and they come in two sorts. With a text field, you declare how many characters the string is going to hold in the properties at the bottom of the screen. The maximum number of characters is 255. A memo field is a effectively a text field of (practically) unlimited length - this is good for adding fields to your database for notes, etc., but will be less efficient for fields containing just a few characters. |
| Dates |
There are various date formats that control the way in which the date appears - they have no effect on the way in which it is stored. However, be careful when using the Now() function - it stores the time as well as the date and can upset any queries using dates. It's probably better to use Date(). |
Naming Fields
While Access allows you to put spaces in table and form field names, it's not a good idea - use underscores or capitals to make names more legible. The reason for this is that it becomes difficult to refer to objects with spaces in their names if you're going to write macros in VBA. Access will also allow you to use VisualBASIC keywords as field names, but clearly this isn't a good idea, either, as referring to a field called, say, Next in a macro will probably cause an error to occur.
Indexes
The data can be stored in a database in any order (normally the order in which you enter it). For this reason, it can often take a long time to find a record in a very large database, particularly if you are making a complex query across several tables.
Access can speed things up by creating an index. This is applied at the field level and works like the index in a book. An index tells the DBMS where a particular record is located within the database. You do not need, therefore, to search through every record in the database to find the ones that match your criteria. You just need to search through the index.
Reports and queries that use several tables benefit especially from the use of indexes. It is a good idea to ensure that your primary and foreign keys are indexed (in fact, Access will probably insist that they are when you related the tables). By changing the indexes in a database of several thousand records, I once reduced the time it took to run a report from about half an hour to less than a minute!
Relationships
Relationships are created in Access by making the links between tables that are represented graphically, like creating an entity-relationship model. Select Relationships from the Tools menu, or click the button on the toolbar to display the relevant screen.
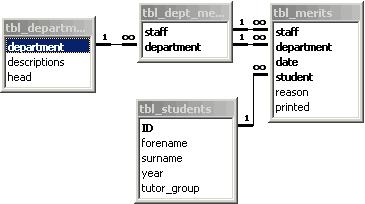
Your tables will be unlinked to begin with. Before you can link two tables together, there must be fields in each that represent the same thing (e.g. in our merit database example, there must be student name fields in both the student table and the merit table, and staff name fields in both the merit and staff tables).
To create a relationship between two tables drag the field that is the foreign key in one table to the second table. A screen appears where you can select various options.
If you are using a compound key, you will need to set more than one field to be equal to a field in other table (this will make sense when you see the screen!).
The degree of the relationship (e.g. one-to-one, one-to-many, etc.) will not be shown unless you select "Enforce Referential Integrity". Access autommatically determines the degree of the relationship based on the keys in the two tables being linked. If the degree of the relationship is not as you expected, the most likely cause is that you've made a mistake when selecting your compound key in one of the tables.
Referential Integrity
What would happen if you had two records in your database that were linked by a relationship, and then the foreign key or the primary key changed? Or one of the records was deleted from the database? For example, in our merit database, what would happen if you gave a merit to someone who then changed tutor groups or left the school completely?
The two records would no longer be linked properly, and "referential integrity" would be lost (i.e. the rules governing how the data are related have been broken).
There are two ways around this problem:
- The simplest thing would be to stop the user making any change that would threaten referential integrity. You may have already noticed that Access won't let you delete information from a linked field, or enter information that would prevent it from being linked to another table (e.g. in our merit database, it won't let you enter merits for students or staff who don't exist in the student and staff tables).
- Some database programs allow you to "cascade" any change to keys to other tables, so that if you change a key field, the matching fields in other tables are also changed. So, if one of the students in our student database were to change tutor group, for example, the tutor group field in the merit table would also be updated and the records would still be linked.
Forms

Forms in Access are screens that you can create to go on top of the database tables to make them easier to use. That is, you can create a nicer user interface with buttons, etc., to help the operator use your database.
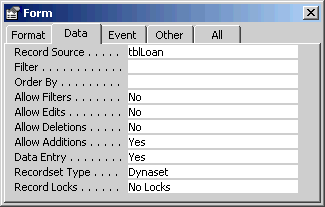
Another benefit of using forms is that you only have to show the fields that a particular user needs to see. You can hide things like counters, and also include information from other, linked tables. Forms can be used to display information from existing records, or, if the Data Entry property is set to Yes, the form can be used for entering new records whilst hiding existing records from the user.
A particularly useful type of form is the one you can create with the "Mainform/Subform" wizard. This lets you create a form based on one database table that contains matching information from another table, so you could create a form based on the student table that had a list of the student's merits (from the related merit table) at the bottom.
In fact, forms don't have to be based on database tables at all. They can also be bound to queries, or you can also them with queries and reports to produce a type of dialogue box to request criteria for the search. Just create a form as normal, but don't base it on a table. Fields from this form can then be included in a report or query just as though they were in an ordinary database table.
We could create a form, for example, that asked for two dates, and then create a query and report that printed a list of all merits given between these two dates.
In a form, if a field is bound to a database field, then any information entered in that field is saved to that table. You can select a field to bind to in the Control Source option of the Data Properties section of the field properties.
If a form field is unbound, that means it is not attached to a database table, and the information is not saved. Unbound fields can be used to display information that is looked up from other tables, or to collect information to simulate a dialogue box. You can perform calculations by entering an Excel-like formula as the Control Source property.
As well as the individual controls on the forms having properties, the form itself has properties. If you click the right mouse button on the grey area that is outside the area of your form, but still inside the window that contains the form, there are options in Layout Properties that you can set. These control things like whether the user can resize or minimise the window, whether scroll bars appear, and whether or not there are any Record Selectors or Navigation Buttons (these are the Next/Previous arrow buttons which are normally at the bottom of the window). Finally, you can select in Default View whether the user can see a Single Form (i.e. record) at a time, or whether multiple records can be seen.
Startup Page/Menu
In Access you can create a macro that is run automatically when a database is opened. Just create a new macro, and call it AutoExec. Anything you set the macro to do will then be done when you load your database. If you use Access 97 (or a newer version), then you can choose a form to be displayed automatically when the database is opened (choose Startup... from the Tools menu).
This can be useful for creating a "welcome" page, or a menu. Just create the page as a form, and create your AutoExec macro to open the form.
User-defined queries
You may want to create a query that allows the user to enter some or all of the criteria for the search. You can do this quite simply by creating a form that can be treated as a dialogue box.
To create a query that takes user input, follow the steps below:
-
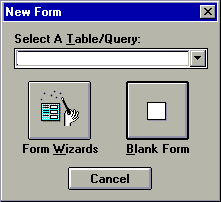
Create a form to be used as your dialogue box. Don't bind it to a table - just create a blank unbound form (i.e. don't select a table from the list, just click the Blank Form button) and add the fields and combo boxes you require.< To create a field, click the
 button
on the toolbar. The type of the field (e.g. date) can be set in the
Data Properties section (shown further down), as can any
default values. To have a date field default today's date, for
example, enter =Date() in the Default Value
field in properties. There are more functions available if you click
the ... button to the right of the field.
button
on the toolbar. The type of the field (e.g. date) can be set in the
Data Properties section (shown further down), as can any
default values. To have a date field default today's date, for
example, enter =Date() in the Default Value
field in properties. There are more functions available if you click
the ... button to the right of the field.
You can create a combo-box (i.e. a field with a drop-down list of options) in a similar way by clicking the button
instead of .
button
instead of .
It is a good idea to give your fields a name at this point (which is also done in Properties) so that you can refer to them later. - Create the query as normal, but instead of entering fixed search
criteria, enter the value from your form. You can do this by clicking
the right mouse button and selecting Build from the menu
that appears.
On the Expression Builder screen, double-click the Forms branch, then All Forms, and finally the name of the form that you are using as your dialogue box. All the fields on the form appear in the middle of the screen.
Double-click the one you want and click OK. Enter any other criteria and the fields you want the query to display as normal and save the query. -
If you want the results of the query to be output to the printer, you can also create a report at this time, and bind it to the query.
- The final stage is to add a button to your form to run the query or
report.
Return to your form in design view and add a command button. This can either run the query or report directly, or you can create a macro and get your button to run that.
When you create a button, a wizard appears which takes you through the steps required to make it do what you want, display text or a picture on it, etc. When you come to select the action of the button:- If you want your button to print a report, select the Print Report option from Report Operations.
- If you want your button to display a report on the screen, select the Preview Report option from Report Operations.
- If you want your button to run a query, select the Run Query option from Miscellaneous.
- If you want your button to run a macro, select the Run Macro option from Miscellaneous.
You will then be asked which query/report/macro you want to run, so you need to have created it already. It may be a good idea to add another button at this point to close the form (e.g. one called "Cancel").
All you need to do now to run your query or report is open the form that you are using as your dialogue box.
Displaying Information from Other Tables
Quite often it would be nice to see related data from another table. For example, when you are entering codes that relate to records from other entities. In the Merits database, for example, you are required to enter the students name and the staff initials on the merits form. The enforcement of referential integrity means that you are only allowed to enter the names of students who are in the students table, and the initials of teachers who are in the staff table.
Two techniques might be useful here; the ability to select these names and initials from a drop down list, and also to be able to check whether the initials you have entered relate to the correct person.
Combo boxes
Creating a combo box (i.e. a field where the user selects a value from
a list) isn't too difficult in Access. The first thing you
need to do is add the control (control is the generic name for things on
a form, e.g. fields, buttons, etc.) to the form by clicking the combo
box button: ![]()
The first thing you need to do is go to the Data Properties, and bind the combo box to a field (assuming you're not creating a dialogue). If you have based your form on a query, the Control Source field will itself be a combo box, and you can select the field from the list.
At this stage, you have two choices. You can either select Value List as the Row Source Type, and enter your list of choices into the Row Source field (separated by commas), or you can get Access to create the list based on the values in a table.
To get Access to generate the list, select Table/Query in the Row Source Type field, and then click the ... button that appears next to the Row Source field.
The screen that appears can then be used to generate the combo box entries in exactly the same way as the query screen. You can even check (i.e. put a cross in) multiple boxes and have several fields displayed when you click the arrow or press F4 on the combo box (although only one will be saved in your bound table).
You can also use combo boxes to set the values of other fields (i.e. text boxes) on your form. Imagine, for example, that you wanted to be able to select a product from a combo box, and have its price shown in a text box on the same form. You can do this as follows:
In the combo box Query Builder (i.e. the thing that appears when you edit the Row Source in the combo box properties, shown below left), make sure you include all of the fields that you want to display on the form. In this example, my combo box is going to show the product description and store the product ID in the combo box itself, but I've included the price because I want to show that elsewhere on the form.
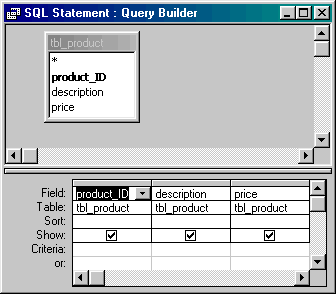
In the combo box properties, make sure that the Column Count is set to the right number, and that the Column Widths are set to 0cm for all columns that you don't want to appear in your combo box (see example, below right).

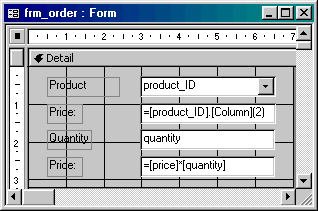
The final step is to add the text box for the price and set the Control Source so that it refers to the appropriate column from the combo box. The columns are numbered starting at zero, so the third column is column 2.
There is a combo box property called Column (although it doesn't appear in the Builder) which takes as a parameter the column number and returns the value in that column for the row selected by the user.
In this example, entering =[product_ID].[Column](2) as the Control Source will give the price of the product selected by the user.
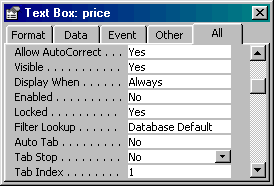
The only other thing you might want to do is disable and lock the price text box so that it can't be selected by the user, and set the Tab Stop property (on the Other tab) to No so that the focus jumps over the control when the user presses the Tab key.
Sub-Forms Based on Tables
Sometimes it is useful to "lookup" values from another form or table, for example to check that the right code has been entered (see example here).
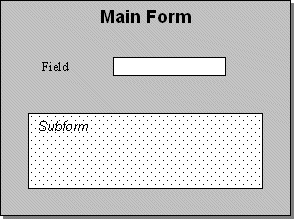
The only obvious way to do this is by using a subform. A subform is a way of embedding one form into another. The relationships you have created will then ensure that the record shown in the subform is linked to the one displayed on the main form.
The first thing you need to do (if you're not using the Wizard) is to create the subform. Create the form that you wish to appear inside the main form, and set the fonts, colours, etc., as you want them.
On your subform you need to include all the fields that you want to display on the main form, plus any that are used to link it to the main form. So in my example, I included a staff initial field on the subform as well, but in the Properties I set Visible to No. It makes things much easier if you give your textboxes, etc., on the form proper names, and make them the same as the names of the fields in the table to which they are bound.
The next stage is to open in Design View the form you want to
use as your main form and insert a container for the subform. You can do
this by click the Subform/Subreport button on the toolbar. It
looks like this: ![]()
Drag out a box large enough to contain the information you want to display, and go to the Data Properties.
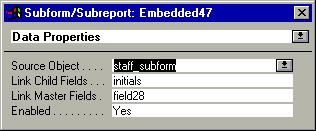
In the Source Object field, enter the name of the subform you have just created (i.e. the name of the form that contains the information you want to display on this form). The Link Child Fields and Link Master Fields fields are used to link the two forms together, just as a relationship links together two table. You must enter the names of the fields on each form that are equivalent.
This is the point where you will reap the benefit if you have your form fields the same name as the database fields, because Access will complete the Link Child Fields and Link Master Fields fields for you.
In Link Master Fields, you enter the name of the field on the main form that is the key to the subform (i.e. in my example it is the initials field, which is called Field28, because we want to "lookup" the name to go with those initials). In Link Child Fields, you enter the name of the corresponding field on your subform (which is probably the one that you made invisible).
If you're using a compound key, or need to include two or more fields in the link between the two forms, separate the field names with a semi-colon, and make sure that they are in the same order in each box.
Hopefully, that should be all you need to do to make the information appear on the form. You will probably need to adjust to the subform properties to stop things like scroll bars and record selectors appearing if you want the subform to integrate seamlessly with your main form, like I have done in the example above.
You can also use the same technique to display tables of information, such as a list of all the merits for one student, or all the merits given by one member of staff. The only thing you need to do differently is to change the properties of the form you are using as the subform so that the view is Continuous.
Sub-Forms Based on Queries
Another useful technique is to base your subform on a query, rather than a database table. This is probably easier, because you don't need to select any child and master fields. What you do need to do, however, is ensure that you requery your subform when anything on the main form is changed.
Referring to Values on Subforms
Sometimes you might want to refer to a value on a subform and use it in a calculation on your main form, or vice versa. This isn't too difficult, but you need to remember that you can't refer to a value on a subform as though that form were open and existing on its own, because Access won't recognise it as existing.
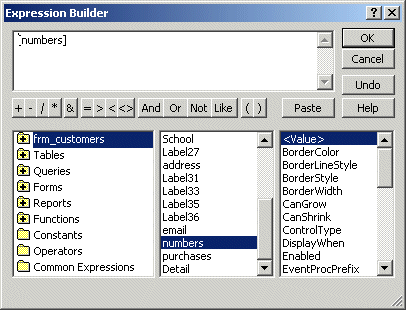
You need to access the fields on the subform through the subform object on the main form. That is, when you use the Expression Builder, don't select the subform from underneath the Forms branch, but select the main form, and then in the middle box double-click the name of the object that is the subform.
You then need to manually add to the top box an exclamation mark, followed by the name of the field on the subform that you want to use - e.g. if the field you wanted to use was called tel_number, the full entry in the top box would be: [numbers]![tel_number]
To refer to a field on the main form from within a subform, you effectively do the same thing, but the main form is always called parent, e.g: [parent]![address]
Requerying
The requery action in VBA re-runs the query upon which something (e.g. a combo-box or subform) is based, thereby updating the information that it contains. This needs to be triggered using some sort of event on your form - it is best done using the OnChange or OnLostFocus event of any field that is used in the query (OnLostFocus seems to be most reliable). The OnChange event occurs when the value in a field is changed - this works well for combo-boxes, but doesn't always been to be triggered for textboxes.
These events are found on the Event tab of the properties dialogue (shown above) of the field or button that you want to use to trigger the requery - not the object that you want to be requeried. If you click on the ellipsis button next to the name of the event, you will be given three choices - select Code Builder to be taken to the Visual BASIC editor.
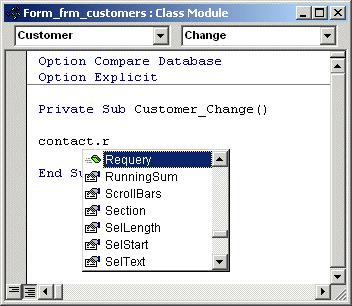 You
then just need to type one line of code - this will be the name of the
object to be requeried (i.e. the subform or combo-box), followed by .requery.
This name is name you gave the object on the form, not the name of the
field in the table. You can tell when you've got it right, because when
you press the full-stop, .requery will be in the list of
properties and actions.
You
then just need to type one line of code - this will be the name of the
object to be requeried (i.e. the subform or combo-box), followed by .requery.
This name is name you gave the object on the form, not the name of the
field in the table. You can tell when you've got it right, because when
you press the full-stop, .requery will be in the list of
properties and actions.
Visual BASIC for Applications (VBA)
According to the A level ICT syllabus, creating a wholly programmed solution is not in the spirit of the course, so you should only use VBA sparingly in your systems (if you need to use it at all).
Most of the things that your system needs to do can be accomplished using standard Access functions. The sorts of things you might need VBA for are:
- Requerying subforms and combo-boxes (discussed above)
- Enabling, disabling and hiding controls (discussed in the Forms section)
- Checking for overlapping appointments (discussed in the Practical Examples section)
- Displaying confirmation messages using message boxes
- Copying values from one field or form to another
VBA functions are linked to events in your system, such as buttons being clicked, fields being changed, or even forms being opened and closed. To enter the code, go to the Properties for your chosen object and click the Event tab. In there will be a list of all of the events for the object (not all objects have the same events - forms will have an OnResize event, for example, but buttons won't, because they aren't resized in normal use). Click on your chosen even, and the ellipsis (...) button will appear to the right. Click that button and choose Code Builder.
Message Boxes
A useful feature of VBA is that you can display pop-up messages to convey information to the user, and ask for confirmation for certain actions, such as closing the system. These are known as message boxes and there is a command in VBA called msgbox() that allows you to control their appearance.
If you just want to display a message (with an OK button), the syntax is quite simple. For example, to display the word Hello in a message box, the command would be:
Note that any text you want to display must be enclosed in speech marks.
There are more options that you can select, but be aware that if you enter more than just the message, then the msgbox() command returns a value, so you use a variable or another command, such as if to handle the value it returns.
As you type a command, the VBA editor will help you with the options, displaying drop-down lists of all the options at each point - the only thing you really need to remember is that all of the options are separated by commas. You can also use the help, of course, by highlighting your command and pressing the F1 key.
If you want to display a message box, with the title "Confirmation", the message "Are you sure?" and Yes and No buttons, for example, then you would use the following code:
Remember that all text values need to be in speech marks. Remember also that when you use msgbox() in this way, it returns a value, so you can't use the command on its own - probably the best thing to do would be to use if, so if you wanted to add some confirmation messages to your system, you could do something like this (on the OnClick event of your Exit button):
(this is in a small font so that it all fits on one line - lines in the VBA editor are much longer).
The If Command
The If command is used to make decisions in your macro, and can be used either on one line, or as a more complex version with an else clause. The general format is either:
Or, if you want to have an alternative action:
If test_condition then
action
Else
other action
End if
Setting the Values of Fields
You can set the value of a particular field (or, indeed, any other property, such as visibility, or whether the field is enabled) from your code quite simply by accessing the properties of them using the name that is at the top of the All tab in the properties. For example:
field_name.value = "Hello"
field_name.value = date()
field_name.value = other_field.value
field_name.enabled = TRUE
field_name.visible = FALSE
Remember that you need to enclose all text values in speech marks. You can also use functions such as date(), and the predefined constants TRUE and FALSE (which do not need to be in speech marks).