If you've ever received any junk mail through the post, you may have wondered how it's done. You know the sort of thing, "Dear Mr Smith, you could soon be driving up Acacia Avenue in a brand new car..." Do they have teams of people typing out letters to all the people on their mailing list? Of course not - they use something called mail merge.
A mail merge consists of two parts - the letter you want to send (the master document), and the list of people you want to send it to (the data source). In fact, they don't have to be letters and people - you could use the same techniques to print invoices, timetables, job sheets, etc. While you might not want to send many items of junk mail yourself, you could use the same technique to print all the envelopes for your Christmas cards, for example. This page explains how to do it, and even includes an example!
Please note that mail-merge is one of the things that has got progressively worse with every new version of Word. These instructions apply to Word 97 and Word 2000 - I will endeavour to update the page.
Master Document
When you're doing a mail merge, the first thing you need to do is select the document you want to merge. You can either use an existing document or start a new one. If you want to use an existing document, load it now, otherwise start with a blank document.
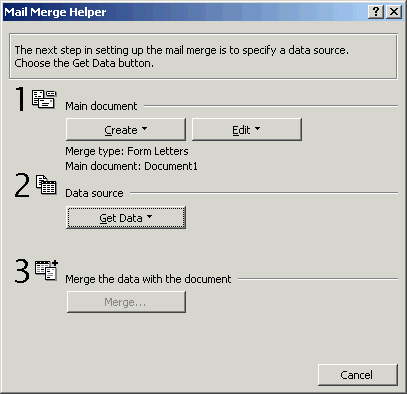
To create the master document, first select Mail Merge from the Tools menu.
In the Main Document section of the screen that appears, click the Create button, and select Form Letters. You will then be asked which document you want to use as the template for your letter. Select Active Window to use the current document.
Data Source
The data that you want to merge with your letter (i.e. the addresses) is called the data source. Although you can use Word itself to create the data source, it's best to create it as a seperate Excel spreadsheet or Access database, because you can then use it for other purposes (such as an Address book) and merge it with other documents more easily. In the example I've included, the data source is an Excel spreadsheet.
In the Data Source section, click the Get Data button and, if you're using an external spreadsheet or database, select Open Data Source from the list. The Open Data Source dialogue will appear. Select the appropriate type of source (e.g. MS Excel Worksheets) in the Files of Type box, and double-click the files that contains your list of names/addresses.
If you have selected a spreadsheet, you will be asked if you want to use the Entire Spreadsheet - confirm that you do. If your master document has not been merged before, you will be prompted to edit it as it will contain no merge fields.
Inserting Fields
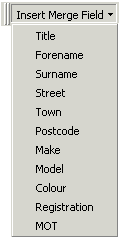
Now it's time to enter the text that you want to appear on your letter (or other document). To include information from your data source, you need to insert a merge field.
An extra toolbar appears, which allows you to enter these fields. To insert an item of data, position the cursor where you want it to go, and select the required item from the Insert Mail Merge menu (shown on the left).
Merge fields because exactly like words, so you will need to insert spaces between them if you don't want them to run together.
Selecting Records and Merging
Once you've finished your master letter, you can either merge it with the whole of the data source, or choose a sub-set of the data.
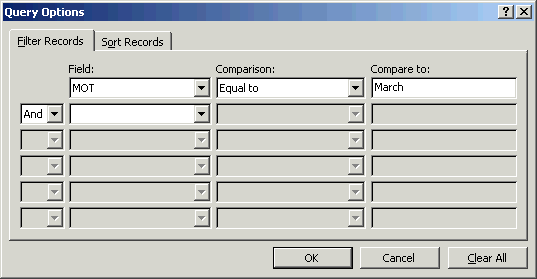
From the Tools menu, select Mail Merge... once more. If you wish to choose only some of the data source, click the Query Options button. You will see the dialogue shown here. It works in the same way as a database search - particularly if you are familiar with Microsoft Works. Choose the field you want to use for your selection criteria, the type of match, and the actual text you're looking for. In the example shown here, we're only sending letters to the people whose cars are due for MOT testing in March. Once you've selected your criteria, click the OK button.
All that now remains is to merge your document and data source. Click on the Merge... button, and another dialogue will appear. It's best to use the default options to merge to a new document, so just click the Merge button.
You document will appear, but the merge fields will have been replaced by details from your data source. You should notice (unless your query only matched one record) that the document has more than one page. There will be a page for each person or thing in the data source - press the Page Down key on your keyboard to see them all. Note that this is a new document - your master letter is in another window underneath this one, so if you've made a mistake, you can close this document, correct the error, and re-merge!
Example
I've created an example mail merge for you to look at - click here to download it. This is a zip file containing a Word document called mail_merge.doc (the master document) and an Excel spreadsheet called mail_merge.xls (the data source).