Programming - Using Arrays for Selection
If you were to search for programming selection in Google, you'd find descriptions of how you can get the computer to make a decision and lots of examples of how to use the if ¦ then ¦ else construct.
There is, however, another way to perform selection that sometimes reduces the computational complexity of your program, but always results in much shorter, tidier code. Using arrays to contain the options within a program is particularly useful where there are many possible outcomes, or for displaying/changing state on a form or web-page. For that reason, most of the examples in this article are in JavaScript, but the technique can be used in any language.
Look for the links on the page and remember that you can view the source of any web-page to see how it works. The example programs contain comments throughout the code to help you to follow them.
The Basic Principle
You might be familiar with the basic concept if you've ever tried to generate a random thing, such as a day of the week or a name from a class list, rather than a random number.
Generating a random number is quite straightforward, so we can generate a random number with seven possible values, but how do we then turn that into a day of the week? You could do something like this (in Python, for example):
  day_no =
  randint(0,6)
  if day_no == 0:
     print("Sunday")
  elif day_no == 1:
     print("Monday")
  elif day_no == 2:
     print("Tuesday")
  elif day_no == 3:
     print("Wednesday")
  elif day_no == 4:
     print("Thursday")
  elif day_no == 5:
     print("Friday")
  else:
     print("Saturday")
That's quite a lot of code just to pick a day of the week, though - if there were more options (such as picking a member of your class) it would start to get a bit ridiculous.
A much more concise solution is to use an array (or possibly list) to look-up the name of the day using the random number as the index, e.g.:
  day = ["Sunday",  "Monday", "Tuesday", "Wednesday", "Thursday",  "Friday", "Saturday"]
  print(day[randint(0,6)])
The second program has two lines of code, compared with fifteen, but it is also less complex because the longer program also contains six comparisons whereas the shorter one has none.
Calculating the Index
Not every program will present you with a nice list of consecutive integers that you can use as an index, of course. You can, though, often perform a simple calculation to create the set of consecutive indexes.
Take lottery balls, for example. In the National Lottery, the balls used to be coloured as follows:
- 1-9 were white
- 10-19 were blue
- 20-29 were pink
- 30-39 were green
- 40-49 were yellow
Conveniently, the numbers are grouped in tens, so if we divide by ten and round down, we do get consecutive integers. For example, if the program generates the number 27, diving by ten and rounding down gives 2. This technique works whenever numbers are arranged into groups of equal size - e.g. if they were grouped in eights, you could divide by eight and round.
The snippet of code required (in Python) to select the right colour for the balls would look something like this:
colour = ["white", "blue", "pink", "green", "yellow"] ball = randint(1,49) print("Ball " + str(ball) + " is " + colour[int(ball/10)])
Notice also that I store the random number in a variable, ball, and use that to print the results - using randint(1,49) twice would mostly likely give two different numbers, and therefore the wrong colour.
Using Boolean Logic
We can extend this technique further and use Boolean logic to calculate the index. JavaScript is nice because you can actually use true and false as the array index, but it's a simple matter to convert Boolean values to integers in most other languages. In Python, for example, int(False) returns 0 and int(True) returns 1. In Visual Basic, true is -1, but we can use abs() or just multiply by -1 to create a positive integer index.
Have a look at the die model example. The decision we need to make when modelling the die is which of the spots should appear to represent the number that we've rolled. There are two ways that we approach this - we think about the number rolled and then decide which spots would be required to represent it (e.g. if we roll a one, then we need the middle spot, if we roll a two then we need the top-left and bottom-right spots, etc.), or we could think about the spot and decide for which numbers it would be required. I'm using the latter method.
The layout of my die is static - the spots are <div>s (with border-radius set to 50% to make them round), so if they are needed for the number rolled I can set the background colour to black, and if they're not required then the background is set to none. If you think of the requirement for a particular spot as being true or false, you could use an array to store the two states of the spot as follows:
var spot = new Array(2);
spot[false] = "none";
spot[true] = "black";
NB. On the actual page I've called the array dot[] to avoid confusion with the CSS class .spot.
The top-left spot is required for any number greater than one, so you could use a construct such as this (where TL is the id of the top-left spot):
var roll = Math.floor(Math.random()*6)+1;

if(roll > 1)
{
   document.getElementById("TL").style.background = "black";
}
else
{
   document.getElementById("TL").style.background = "none";
}
The expression roll > 1 is first evaluated to give the answer true or false - an if statement is therefore just if(true) or if(false). The same is true wherever that expression appears, including inside the brackets as an array index; the whole if() construct could be replaced with just:
document.getElementById("TL").style.background = spot[roll > 1];
Here, roll > 1 is evaluated and the background colour is set to spot[true] (i.e. "black") if the number rolled is greater than one, or spot[false] (i.e. "none") if it's not.
You can also use AND (&& in JavaScript) and OR (||) in your code, so a crude way to code the centre spot (which appears only for odd numbers) would be:
spot[roll == 1 || roll == 3 || roll == 5]
I would, however, prefer to use modular arithmetic (spot[roll % 2 == 1]) or bitwise Boolean logic (spot[roll & 1 == 1]) to determine whether a number is odd as they are more concise.
Finally, because the spots are mostly switched on and off in pairs (apart from the centre one), you can make your program shorter and reduce the number of calculations required by changing two spots at the same time. JavaScript allows you to do this, e.g. a = b = 1 will set both a and b to be 1 in a single line of code.
Using Bitwise Boolean Logic
You could go one step further still with this approach and use bitwise Boolean logic. If you're not familiar with the technique, it's probably easier than it sounds.
My final example is a page that recreates a seven-segment display, like those found in alarm clocks or older/simpler calculators.
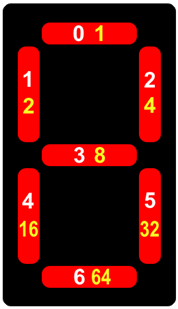
The rules for when each of the segments is displayed are a bit more complicated than for the spots on the die. The top segment, for example, is required for 0, 2, 3, 5, 6, 7, 8, and 9, and the centre segment is required for 2, 3, 4, 5, 6, 8 and 9. These numbers aren't consecutive, so to use Boolean logic in the same way as for the die would result in a lot of ANDs and ORs.
Another approach is to use binary flags. This technique requires you to number the possible options (in this case the segments) in a geometric progression using the binary column headings (see the yellow numbers in the diagram). You can then add together the numbers of the options that you want to be displayed simultaneously. For example, to display a number 7 you need the two segments on the right-hand side and the one at the top, 4 + 32 + 1 = 37.
The combinations for all ten digits can be stored in an array as follows (starting with zero, so that the index matches the digit):
var segments = [119, 36, 93, 109, 46, 107, 123, 37, 127, 111];
To separate these totals out again to see which segments are required for each digit, we can use bitwise-AND to mask the bits.
The use of bitwise logic to combine and separate bits in a single byte is an extremely useful technique in programming because it allows you to combine multiple options in a single value, which you can then store in a variable (or array!), pass as an argument to a function, or pass to a web-page using a cookie.
A more detailed explanation of bitwise logic might be the subject of a future article, but the basic principle is that to see whether a particular bit is set in a number, perform a bitwise-AND with the number you're checking and the place value of that bit.
In the seven-segment display, the segment in the middle of the display has the value 8. To see whether the middle segment is required to display a particular digit, we need to use bitwise-AND to combine the 8 and the total that represents the digit. If the binary representation of the total has a 1 in the 8 column then the result will be 8, otherwise it will be 0. We could do this operation and use the answer as the array index, just as we did with the die example - remember that you don't need to use consecutive elements when using an array.
We can now proceed in a number of ways. In my version, the segments all have a CSS class of seg, so I can put them into a collection (i.e. array) using document.getElementsByClassName("seg"). This effectively numbers the segments (generally the default order is top-to-bottom and left-to-right) as shown by the white numbers in the diagram.
The segments on the page are now numbered sequentially (the white numbers), but the values used to represent them in the array (the yellow numbers) are in a geometric progression, increasing by a factor of two each time. We need to establish the relationship between the two numbers.
If you're familiar with indices, or how the column headings work in numbers bases in general, you might be able to see that the yellow number is two to the power of the white number - e.g. 20 = 1, 21 = 2, 22 = 4, etc. The code uses this relationship to work out which bit should be masked based on the array index. Math.pow(2, i) is the JavaScript command to do the calculation - in Python it would be 2**i:
flag = Math.pow(2, i);
LED[i].style.background = segment[(segments[current] & flag) == flag];
In this snippet, LED is the array containing the segments, i is the index (i.e. the white number) and flag is the value assigned to the segment (i.e. the yellow number).
First, the expression segments[current] & flag is evaluated. This is a bitwise-AND operation that masks off of the bits in segments[current] other than the one that represents flag. The result of this operation will be either flag if the flag bit is set, or 0 if it isn't.
The possible results for this operation will be in the geometric sequence 1, 2, 4, 8, 16, etc. and you can use this number directly as an array index if the segments are in some way different - e.g. they were different colours. You don't need to use consecutive elements in an array - it can be sparsely populated - you can just define the elements you need. That's messy to implement in a list, though, because you can't miss out any of the elements - you'll need to pad out your list with dummy values.
As all of my segments are the same colour, I really only want to know whether the segment needs to be lit or not, and I'm using a Boolean array index as I did with the die example. To create this, I'm comparing the value returned by my bitwise-AND operation with the value of flag, i.e. (segments[current] & flag) == flag, to give me a result of either true or false which can be used to set the colour.
While all of these techniques - arrays, binary and Boolean logic - appear individually in the KS3 curriculum and are relatively straightforward, anyone familiar with Bloom's Taxonomy will appreciate that there's a big difference between being aware of or understanding them, and being able to synthesise a solution requiring a combination of all of them. Realistically, I wouldn't expect a KS3 student to be able to do this - indeed, I'd only expect exceptional KS4 students to program in this way - but we should give those more able students the option of being able to see what's possible.
This blog originally appeared in the TES Subject Genius series in January 2016.