These notes can also be downloaded as a booklet in Word format, either zipped (84kb) or unzipped (149kb).
A macro is a small program, or set of commands, that runs inside another application. They allow you to record and automate procedures that take many steps, and repeat then with a keystroke or the click of a button. Excel lets you record macros, but it also lets you create new macros, or edit recorded ones, using a macro language called VBA (VisualBASIC for Applications) which is a subset of the VisualBASIC programming language.
Recording a Macro
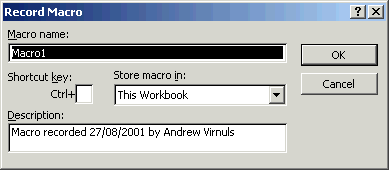
Creating a macro in Excel is quite simple - you can just do manually what you want your macro to do, and record the steps. To start recording, select Macro from the Tools menu, and the choose Record new macro... - the dialogue on the right will appear. Enter a name for your macro (don't be lazy - it will make things much easier later on if you give your macro a proper name) and click OK. A stop button will probably appear, and Excel starts recording your steps.
The next step is to do for yourself what you want your macro to do. When you've done that, click the stop button. If the stop button hasn't appeared, you can stop the recording using the Tools menu (select Macro, and then Stop Recording).
When you record a macro, there are a few things you should bear in mind:
- When you start recording, make sure that you are in the same place (i.e. on the same sheet) as the user will be when the macro is executed, i.e. on the sheet where the button is going to be. If you're going to run the macro from two different sheets, start recording on the sheet that's "furthest" from the sheet where the first step takes place - e.g. if you're going to run the macro from sheet 1 and sheet 2, and the first step in the macro does something to sheet 2, then start recording on sheet 1; this will ensure that the first thing the macro does is go to sheet 2.
- Don't just think about what the macro is going to do - tidy up after yourself! Think about what the user is most likely to be doing next, and help him/her out by changing to the correct sheet and clicking in the correct cell. If your macro does some copying and pasting, you might also want to press Esc before you stop recording, to remove the border from the copied range.
- If you're going to protect your sheet, remember that the first thing your macro will need to do is unprotect the sheet, and the last thing will be to protect the sheet again.
When you record a macro, Excel converts your actions into commands from the VBA programming language. You can have a look at these commands and edit them to do exactly what you want (see below). For example, if you record a macro to Save As, then your macro will look something like this (the underscore characters indicate that the command continues on the next line):
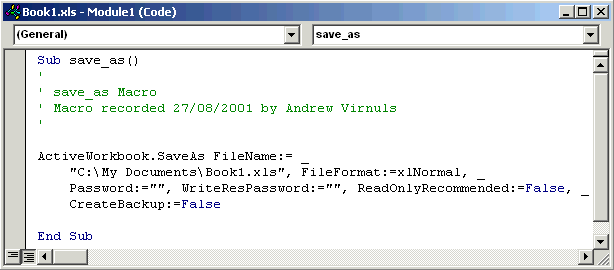
To see what your macro looks like, select Macro from the Tools menu, and then choose Macros.... Highlight the macro you want to have a look at, and then click the Edit button.

Adding a Button
You may have noticed from the Record Macro dialogue that you can assign a keystroke to your macro. It's more user friendly, though, to add a button to your worksheet so that you can click to execute the macro. You can add buttons from the Forms toolbar. To view the toolbar, click the right mouse button on the Excel menu bar (i.e. at the top), and select Forms. The Button button is the second one down on the right.
Click the Button button and draw the button onto the worksheet. You can move a button at a later time, or change the text, by clicking on it with the right mouse button. After you've drawn on your button, the Assign Macro dialogue will appear - select your macro and click OK.
Editing Macros
There are some actions you can't record - e.g. closing down Excel, choosing things such as filenames, or reacting to user input. For these, you will need to create or edit a macro yourself using the VBA programming language - I will describe how to do these three things now. In order to minimise the number of commands you need to know (remember that programmed solutions aren't in the nature of the A level ICT course!), you can often record most of what you want your macro to do, and then amend the code slightly afterwards. The techniques I'm about to describe are included in the example spreadsheet that you can download.
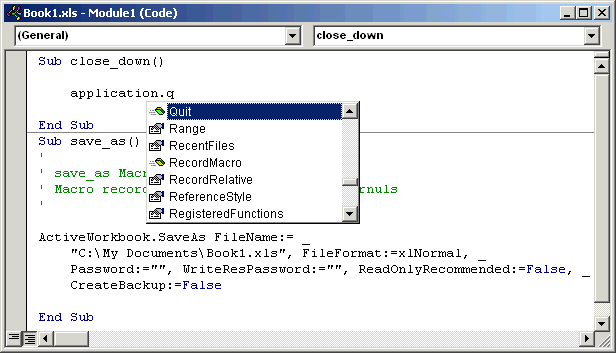
When you're editing a macro, the macro editor does try to help you out a bit. Macros use the same system of objects, methods and properties as does VisualBASIC (see also the Programming section). When you type a valid object name followed by a full-stop, a list of valid properties and methods for that object will appear. This also helps you out by telling you that you've got the object name right! Also, when you're entering a command that takes many arguments (e.g. msgbox(), discussed below), a tool-tip appears to remind you of the options - the ones in square brackets are optional.
Referring to Cell Contents
We'll start with the save_as macro you recorded above. That macro will use the same filename every time you run it. Suppose, for example, that you want to allow the user to enter a filename into a cell, B2. The VBA property that contains the contents of cell B2 is Range("B2").Value (there are other ways of finding the contents of a cell, but this works as well as any). All you need to do to amend your save_as macro to replace the "C:\My Documents\Book1.xls" with Range("B2").Value. Next time you run your macro, the contents of the cell B2 will be used as the filename.
While a command like range("a1").value is the easiest way to refer to the contents of a cell, you can also use the command activesheet.cells(row,column).value, where row and column are numbers - i.e. range("c5").value is equivalent to activesheet.cells(5,3).value. While this might seem more difficult, it means that you can select cells using either random numbers or the results of a calculation.
Dates in Excel
In the example, I've put a formula (=INT(NOW()*1000000) in B2 so that each time the spreadsheet is saved, it has a unique name. The =now() function returns the current date and time, but it's useful to remember that dates are stored internally as the number of days since 1/1/1900 - this means, for example, that you can go back or forward a week by simply subtracting 7 from, or adding 7 to, a date.
You could also work out what day of the week a given date is on by subtracting a date with a known weekday, and using the =mod() function (e.g. 20/10/2002 is a Sunday, so if 20/10/2002 was in A1, =mod(now()-A1,7) would give you the day of the week as a number - you could then use =vlookup() to give it a name).
Creating a New Macro
You can start a menu from scratch by selecting Macro from the Tools menu, and then choosing Macros.... If you enter a valid name in the Macro Name: field, the Create button will become enabled, and you can click it to start a new macro. If you want to create a macro that closes Excel, for example, simply enter application.quit as shown (almost!) in the example above. You can then add a button in the usual way, and use the macro.
Note that if you've changed your spreadsheet, then running your macro will do the same as trying to close Excel using the menu, Alt F4 or the Close button - i.e. you will be asked if you want to save your file. If you want to have more control over the user interface and stop this happening, you can use the msgbox() and if commands.
Using msgbox() and if
The msgbox() command can be used to display messages for the user. If you want to use it in this way, you just need to give it a string as an argument, e.g. msgbox("Hello!").
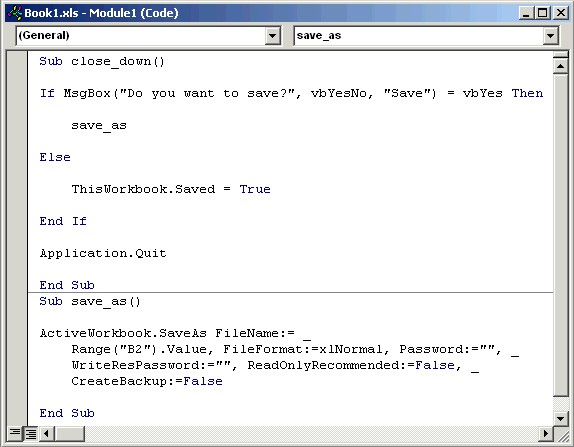
You can also change the type (i.e. the types of buttons that appear below the message) of the message, and use the command to record the user's response. For example, you can have Yes, No, Cancel, etc. buttons on your message, and check which one the user clicked. When you use msgbox() in this way, it always returns a value, so you need to use it with a variable or another function that takes a value, such as if. It's probably easiest to use an example - you could use if and msgbox() to ask the user whether he/she wants to save before closing Excel:
Note that there is also an inputbox() command, which works in a similar way and allows the user to enter a number or some text. The function returns the value that the user entered.
What you can see above is the finished macro. When the close_down macro is executed, the user is asked "Do you want to save?" ("Save" is the window title for the message). If Yes is clicked, the spreadsheet is saved using the save_as macro. Notice that you can run another macro by simply including its name in your macro.
If you try to close Excel without saving, it will prompt you to save - the else case tidies this up so that the user isn't asked again. ThisWorkbook has a property called Saved, which indicates whether the spreadsheet has been saved since the last change was made. If the user wants to abandon the changes, we can "trick" Excel into thinking that there are no changes to be saved (in which case it won't ask) by setting the value of Saved to True.
The final step is to close Excel, using application.quit, which we want to do regardless of which button the user clicks.
Updating the Screen
If there are a lot of steps in your macro, or it changes between sheets, then there can be a lot of flickering going on while your macro is running. There is a property in Excel's VBA called application.screenupdating, which takes the values true or false. To stop the screen flickering while your macro is running, set application.screenupdating = false at the top of your macro, and then set application.screenupdating = true again at the bottom - if you don't set the value back to true, then you won't be able to see what your macro has done!
Events
While the most common way to start a macro will be to click a button that you have added to the worksheet, you can also trigger a macro using other events.
If you press Alt + F11 to view the Visual Basic editor, you can select these other events. The tree at the top-left shows all the objects in Excel - if you double-click one of the branches, the associated code window will appear in the right-hand pane.
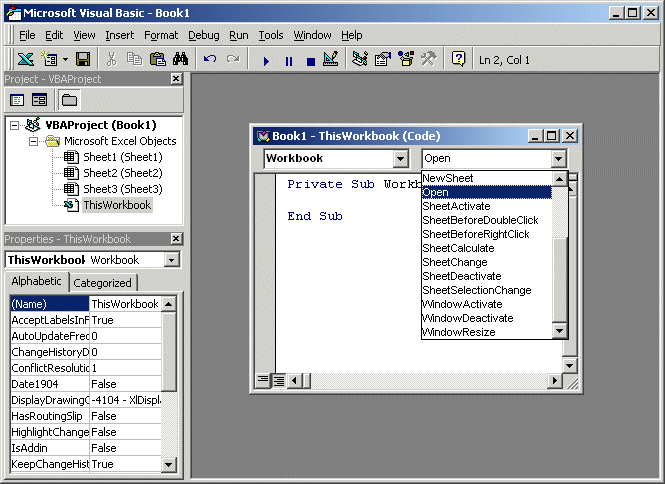
At the top of the code window, there are two combo boxes - the one on the left normally defaults to (General) - this is used for things like variable and function declarations, which are beyond the scope of A level ICT.
If you select the other option (e.g. Workbook in the example shown here), the right-hand combo box will be filled with all the events that can occur within that object - i.e. whether it can be clicked, double-clicked, opened, closed, etc.
When you choose one of the event types, a new subroutine (i.e. macro) will be created, and this subroutine will be associated with the event selected � e.g. if you selected Activate for a Workbook object, then the macro will be run whenever someone selects that sheet.
You can then enter any commands that you want to be associated with this action. Remember that you can run any other macro, e.g. one that you have already recorded, just by entering its name - see the if/then/else example above.
Examples
I've created two systems (EU Games and Library) to demonstrate the techniques described on this and the previous page.
EU Games
This is the solution to the problem - the key techniques used being vlookup() and Paste Special. The cells that are in grey would normally be hidden (or the text made green).
When the competitors are entered, the rank() function sorts them into order, and if() is used to assign the medals. You could use vlookup(), of course, but I wanted to include an example with nested ifs. The list of the countries on the right of the Events tab is just there to provide the list for the validation of the Country column.
Then Medals table sheet is where it all happens. Firstly, the vlookup() formulae in column H look up each country's medal from the Events sheet. A vlookup() is needed because the countries on either sheet could be in any order, and some sort of lookup is required to match them. Columns I, J and K are used to separate out how many Gold, Silver and Bronze medals (respectively) that each country has for the current event. Of course, no more than six countries will have a medal, and each will have no more than one, but separating them out like this makes it easier to add them to the total numbers of medals.
All that the Add to Table button on the Events sheet does is copy columns I - K onto columns B - D, using Paste Special to add the values to what is already in the cell. In this way, a running total of medals is calculated.
Although this may seem like a rather contrived example, the solution can be used to form the basis of a simple stock control system, with items selected for purchase on the first sheet, and a record of stock levels kept on the second (with Paste Special being used to subtract rather than add).
Library
Note that this is only a prototype and doesn't contain any real validation - it relies on the "librarian" reading the messages on the screen to prevent erroneous lendings.
This system is very similar to the EU Games one, in fact. It uses vlookup() and Paste Special, and there is only one macro, which pastes column G onto column E on the People sheet, and column I onto column G on the Books sheet. The vlookup() function is again to match up table entries (for books and people), and also to fetch the names, publishers, etc., for the Borrow sheet.
Column G on the People sheet and column I on the Book table both perform the same function. If they weren't there, and columns F and H were pasted instead, all of the existing values in columns E and G would be wiped out. Columns F and H are used to copy values from E and G if they exist, but use the value from the Borrow table if it's different.