These notes can also be downloaded as a booklet in Word format.
Excel is a very powerful and flexible application, and very often it's underused. You can do anything from adding up a few figures using simple formulae, to creating complete systems that resemble relational databases (see examples below). While most of the functions available are numerical or statistical, there are also text and data lookup functions. Here are a few features that you may not know about or may not have used before.
Validation
Using the validation functions in Excel (they're on the Data menu), it is possible to check ranges of numbers or the lengths of strings entered, and also to customise the messages that appear when the validation fails (i.e. when someone enters something that doesn't make sense). You can even add prompts so that the user is told what to enter when he or she clicks on the cell. This is quite straightforward - just select the type of validation you require, and enter the limits and messages.
Probably the most useful type of validation is List. This checks the entries against a list of valid values, either typed into the Validation dialogue or from a range on the spreadsheet itself. More usefully, however, it creates a combo box on the spreadsheet that allows the user to select from the valid entries using the mouse. This is particularly effective when combined with the vlookup() function (see below). The only thing to note is that if you want to use a list from the spreadsheet, the list needs to be on the same sheet.
See also the notes on validation in the Databases section.
Protecting Cells
If you've created an elaborate system that takes user-entered variables and produced some sort of outcome in other cells, then the last thing you want is your user deleting the formulae. Because your formulae generally won't need to be changed, and what you can do is protect the cells that contain them. In fact, if you protect all of the cells into which the user does not need to enter any values, it has the additional benefit of assisting navigation, as the TAB key moves the cursor between unprotected cells. Combine this technique with careful use of borders and background colours, and you can create a user-friendly user interface as well as an effective system.
Protecting cells is quite simple, but there are two steps involved. Each cell has a property to say whether or not it is protected, and the default setting is Locked (i.e. protected). The first step, therefore, is to set the Locked property to false for all the cells that you need the user to be able to change. To do this, you must highlight all of these cells - you can highlight non-adjacent cells by holding down the Ctrl key as you click. Then, select Cells from the Format menu. On the Protection tab, there are two checkboxes, called Locked and Hidden - make sure that Locked is not ticked.
The final step is to switch on the protection - from the Tools menu, select Protection then Protect Sheet.... You will be prompted for a password - be careful not to enter one unless it is absolutely necessary; I have known a number of students who have forgotten their passwords and have had to start their systems again.
Note that when a sheet is protected, certain features no longer work - AutoSum, for example - even when you're not working with protected cells. Also, if you create a macro that writes to protected cells, you will need to unprotect the sheet at the start of your macro, and then re-protect it at the end.
Logical Operators
Excel recognises the values true and false, and also contains logical operations such as the AND(), OR() and NOT() functions. These work as described on the Boolean logic page, and can be used in calculations as shown in the checkbox example below.
Form Features
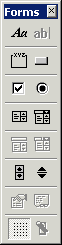
Using the Forms Toolbar (shown right - click the right mouse button on the toolbar and select Forms), you can add common Windows form features, such as combo-boxes and buttons, to your spreadsheet. The two most useful (and easiest to create) are checkboxes and radio buttons (called option buttons in Excel).
Click here to download the checkbox example. The EU Games spreadsheet described on the macro page contains an example of radio buttons in use.
Radio Buttons

Radio buttons are the little buttons normally used for answering multiple-choice questions. Their key feature is that you can only select one at a time (like the stations on a radio - hence the name). You can draw on as many radio buttons as you like, and then link them a cell in your spreadsheet. This cell then displays the number of the button selected - i.e. the first radio button you add inserts a 1, the second a 2, the third a 3, and so on. You can also use them the other way round, i.e. entering a number in the cell sets the corresponding radio button, e.g. entering a 1 "clicks" the first radio button you created.
To link a radio button to a cell, first of all you need to click the appropriate button on the Forms Toolbar (see above) - third button down, on the right - and draw on the radio button where you want it to go. To change the text, or move the button later on, use the right mouse button. To link the button to a cell, click the right mouse button on the radio button, and select Format Control.... Go to the Control tab, and you will see the Cell link: field. In here, enter the reference of the cell you want to use, or use the red arrow to select a cell.
All the radio buttons that you create on a sheet are linked to the same cell - you only need to set this property for one of the options. If you want to create several sets of radio buttons, e.g. for several multiple choice questions, then you need to use a Group Box (second button down on the left of the Forms Toolbar). Draw on the group box, and make sure that all the radio buttons you want to group together are entirely inside the box - this includes the box around the text. All of the radio buttons inside the group box will be linked to the same cell, but those in different group boxes may be linked to different cells.
Checkboxes

Checkboxes work in a very similar way, except that each one is linked to its own cell in the spreadsheet, and it inserts TRUE into the cell when ticked, and FALSE when not ticked. Again, it's useful to remember that this works the other way round, too - if you enter a 0 in the linked cell, the checkbox is cleared, and if you enter a non-zero value, it becomes ticked.
Remember that you can use TRUE and FALSE in calculations, so checkboxes are useful for selecting options and adding in the costs by multiplying the cost of the option by the value in the linked cell. If the option isn't selected, the cell will contain FALSE, and FALSE behaves in the same way as zero, thereby cancelling the cost.
This is what happens in my checkbox example, shown on the right. You can tick the various options, and the total is calculated. The example actually does more than that, because it also contains a stock table, and won't let you select an item that is out of stock. It does this by running a macro when an option is ticked - the macro simply pastes column C onto column B, resetting the button if the item is out of stock.
You can attach a macro to any of the form features by clicking on it with the right mouse button, and then selecting Assign Macro....
Numerical Functions
As you'd imagine, Excel contains a large number of arithmetic, trigonometric and statistical functions. Probably the most interesting from a project point of view are the random number generation and rounding functions.
You can generate a random number using the =rand() function. This generates a (pseudo) random number between 0 and 1 - to get a number between other limits, you need to do a bit of arithmetic. For example, to get a number between 0 and 10, just use =rand()*10, and to get a number between 5 and 15, use =(rand()*10)+5.
This won't give you a whole number, however (unless you're very lucky!). You can round to an integer (i.e. whole number) using =int(), but it's important to remember that this always rounds down, so =int(rand()*10) will give you a whole number form 0 to 9. To simulate the roll of a die (a number from 1 to 6), therefore, you would need to use =int(rand()*6)+1. You might also want to look at how the =mod() function is used in the dice example below.
There are two other rounding functions, called =ceiling() and =floor(). These round up and down, respectively, but also take a second argument, X, and then round the number to the nearest X. So =ceiling(A1, 10), for example, would round the value in cell A1 up to the nearest 10.
Finally, if you're working with sets of data, the =min(), =max() and =rank() functions may be of interest. The =min() and =max() functions find the smallest and largest values, respectively, from the given range - e.g. =max(a1:a10) finds the largest value between a1 and a10.
The =rank() function is used to give one value within a set of values a relative position within the set - =rank(x, y, z) will give you the relative position of value x within set y. If the value of z is zero (or you only enter the first two arguments), the highest value is given the rank 1 (i.e. first). If z is non-zero, then the lowest value is ranked first. For example, =rank(a1,a1:a10) will give you the position of the value in cell a1 within the set of data in the range a1:a10, with the highest value ranked 1, and =rank(b3,b1:b10,1) will rank b3 in the set b1:b10, with the lowest value ranked first.
if()
You can make decisions in your spreadsheet using the =if() function. It takes three arguments in order:
- some sort of test - a comparison or function
- what you want to display if the test passes (i.e. returns true)
- what you want to display otherwise
If you want to display a number or the result of a formula, you can just enter that value or formula as your argument. If you want to display text, you need to enclose it in speech marks. For example, if you wanted to simulate a coin toss, you could use the function =if(rand()>0.5,"True","False").
You can nest functions in Excel, so if you wanted to show whether the value in A1 was positive, negative or zero, you could use =if(A1>0,"Positive",if(A1<0,"Negative","Zero")).
vlookup()
This is a very useful function that enables you to reproduce some of the features of a relational database in Excel. The =vlookup() function (there is a corresponding =hlookup() function, in case your table of data is the other way round, i.e. in rows rather than columns) allows you to take a number or some text, and look that value up in a table in your spreadsheet, and then return some corresponding information.
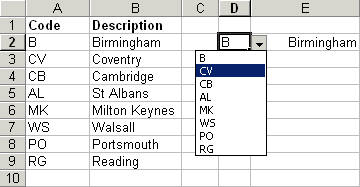
For example, in the spreadsheet shown on the right (which you can download by clicking here), the function looks up the postcode selected by the user in cell D2, and returns the corresponding town/city. The actual function for this is =VLOOKUP(D4,postcodes,2,FALSE).
You will notice that =vlookup() takes 4 arguments:
- what you want to look up - in this case we want to look up the postcode that has been entered in cell D4
- where you want to look it up from - this must be a range, in this case it's A2:B9, which I've named postcodes (see below).
- the number of the column that contains the information you want to fetch - in this case we want the name of the town/city, which is in the second column of postcodes.
- whether you (don't) want to find exact matches in the table, only - in this example it doesn't make sense, because we're looking up text values, but if the postcode was a number, then setting this argument to TRUE would allow you to match values that aren't in the table (e.g. you could create a table of exam grade boundaries, and then look up any percentage to find the grade - this is also done in the downloadable example).
There are a couple of things to be aware of. Firstly, if you want to use TRUE as the last argument, you need to make sure that the numbers in the table you're looking up from are in ascending order, i.e. the smallest number is at the top.
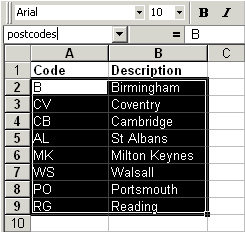
Secondly, if you're going to replicate your formula, you need to make the second argument (the lookup table range) absolute (e.g. by pressing F4), or, better still, give the name as range as I have done. To name a range, you must first highlight it (as shown on the right), and then enter a name in the combo-box above cell A1. Thereafter, you can use this name in formulae, and if you select the name in the combo above A1, the range will become highlighted so you can see where it is. If you need to change the size of the range, select Name from the Insert menu, and then choose Define....
If you use vlookup() to find a value, but there is no match in the table, the function returns #N/A. This can be hidden using conditional formatting (see below) and the =isna() function. The =isna() function returns either TRUE or FALSE, depending on whether a given cell contains #N/A, e.g. =isna(A1) would display TRUE is there was an #N/A in cell A1.
Text Functions
There are also some useful text-manipulation functions in Excel. You can change the case of text (to either upper, lower, or "proper" case, where the first letter of each work is capitalised), trim characters from the left or the right, remove leading and trailing spaces, and find the length of some text. These functions are described below - the examples assume that the cell A1 contains the text conrad night socks, A2 contains 2 and A3 contains F1:
| Function | Description | Example |
| =left(cell, chars) | Finds the first chars characters from the text in cell | =left(A1,6) would give you conrad |
| =right(cell, chars) | Finds the last chars characters from the text in cell | =right(A1,5) would give you socks |
| =concatenate(cell, cell) | Joins together the contents of the two cells | =concatenate(A2,A3) will give you 12F1 |
| =find(text, cell) | Finds the location (i.e. the position of the first letter) of text in cell | =find(" ",A1) will give you 9 |
| =proper(cell) | Capitalises the first letter of each word in cell | =proper(A1) will give you Conrad Knight Socks |
| =upper(cell) | Changes the text in cell so that it is all in upper case | =upper(A1) will give you CONRAD KNIGHT SOCKS |
| =lower(cell) | Changes the text in cell so that it is all in lower case | =lower(A2) will give you f1 |
| =len(cell) | Finds the number of characters in the text in cell | =len(A1) will give you 18 |
| =trim(cell) | Removes all leading and trailing spaces from the text in cell | =trim(" A ") will give you just A with no spaces around it |
Paste Special
You may have noticed that if you copy and paste values in Excel, you actually copy the formulae rather than the values in the cells. If you use the right mouse button or the Edit menu to select Paste Special... you can choose what you want to copy - formula, value, validation, formatting, etc.
Even more useful is the fact that if you choose to copy just the value in the cell, you can add to, subtract from, divide or multiply by the value that's already in the target cell. This can be useful for subtracting items from stock, for example, or adding medals to a medal table in the example spreadsheet discussed on the macro page.

Conditional Formatting
Excel allows you to change a number of aspects of the formatting of a cell - font, size, text decoration, colour, etc. You can also use something called conditional formatting (on the Format menu) to change the colour, etc., of a cell according to its value, or even the value of another cell. This is the technique used in the medals system to display the word "Gold" in gold, the word "Silver" in silver, etc.
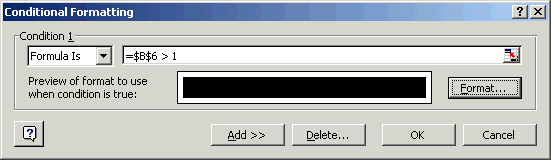
The dice system (shown on the right) uses random number generation to simulate the roll of a die, and then conditional formatting to show you what the die would look like. It does this by setting the background colour of seven cells, depending on the value in B6 (i.e. the number 5 shown here).
If you want to test the value of another cell, you need to use the Formula is option (rather than Cell value is), e.g. to colour a cell other than A1 if A1=0, enter =A1=0 as your formula.
The top-left and bottom-right "spots" are filled in for any value greater than 1. Top-right and bottom left spots are filled in for any value greater than 3. The middle-left and middle-right spots only appear when a 6 is thrown. The only slightly tricky one is the middle spot, which only appears when an odd number is thrown. You can use the =MOD() function to check for this - the =MOD() function performs a division and gives you the remainder. In this case I've used =MOD(B6,2) - if you divide a number by two and there is a remainder, then the number is odd!
Macros
Macros are dealt with on a separate page - click here.
Examples
Sample systems (a library system and a medals table/scoring system) and detailed on the macro page.